Chapter 2: Basic functionalities
Here we will look at the basic features of Cinema 4D. This should teach you how to create some objects, move around in 3D space and manipulate some basic functions within the program. The easiest way to learn is to show.
User Interface

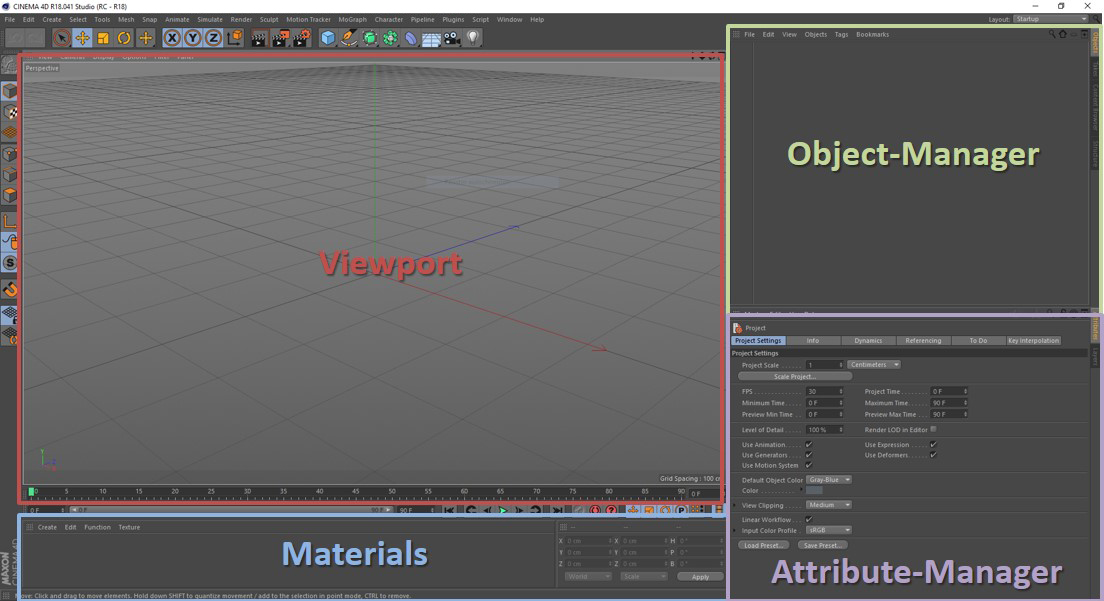
When you start Cinema 4D for the first time, you'll see an interface like the one on the left. Apart from some tools we'll learn about in later lessons, you'll find four main windows. The largest is the Viewport, which displays your current view of your scene. By default it's a perspective view, but we can change that later. Below that is the Material Manager, where you'll see your materials. On the right you'll find the Object Manager at the top. Here you can see a list of all the objects you have created, and you can organise, tag or arrange them. Finally, below the Object Manager, you'll find the Attribute Manager, where you can set all the parameters of various tools or objects. The Attribute Manager will change to whatever you have selected.
Viewports

If you want to change the perspective view of the Viewport, you can do so by pressing F-Keys 1-5. Pressing F1 shows the perspective view (default), F2 shows the top view, F3 shows the side view and F4 shows the front view. Pressing F5 allows you to see all four views at once. Basically you are free to configure your views as you wish, but for now it is important to understand how to change the views using the first five F-Keys on your keyboard. To get to the next step, we will switch back to the Perspective view by pressing F1. As you will learn throughout the semester, shortcuts are a very important tool in Cinema4D, especially if you want to work fast. Please always try to use and remember the shortcuts, it will save you a lot of time. Below you'll find a handy, but equally beautiful list of the five shortcuts mentioned above.
| F1 | F2 | F3 | F4 | F5 |
|---|---|---|---|---|
| Perspective | Top/Bottom | Right/Left | Front/Back | Overview of all Viewports |
Navigation

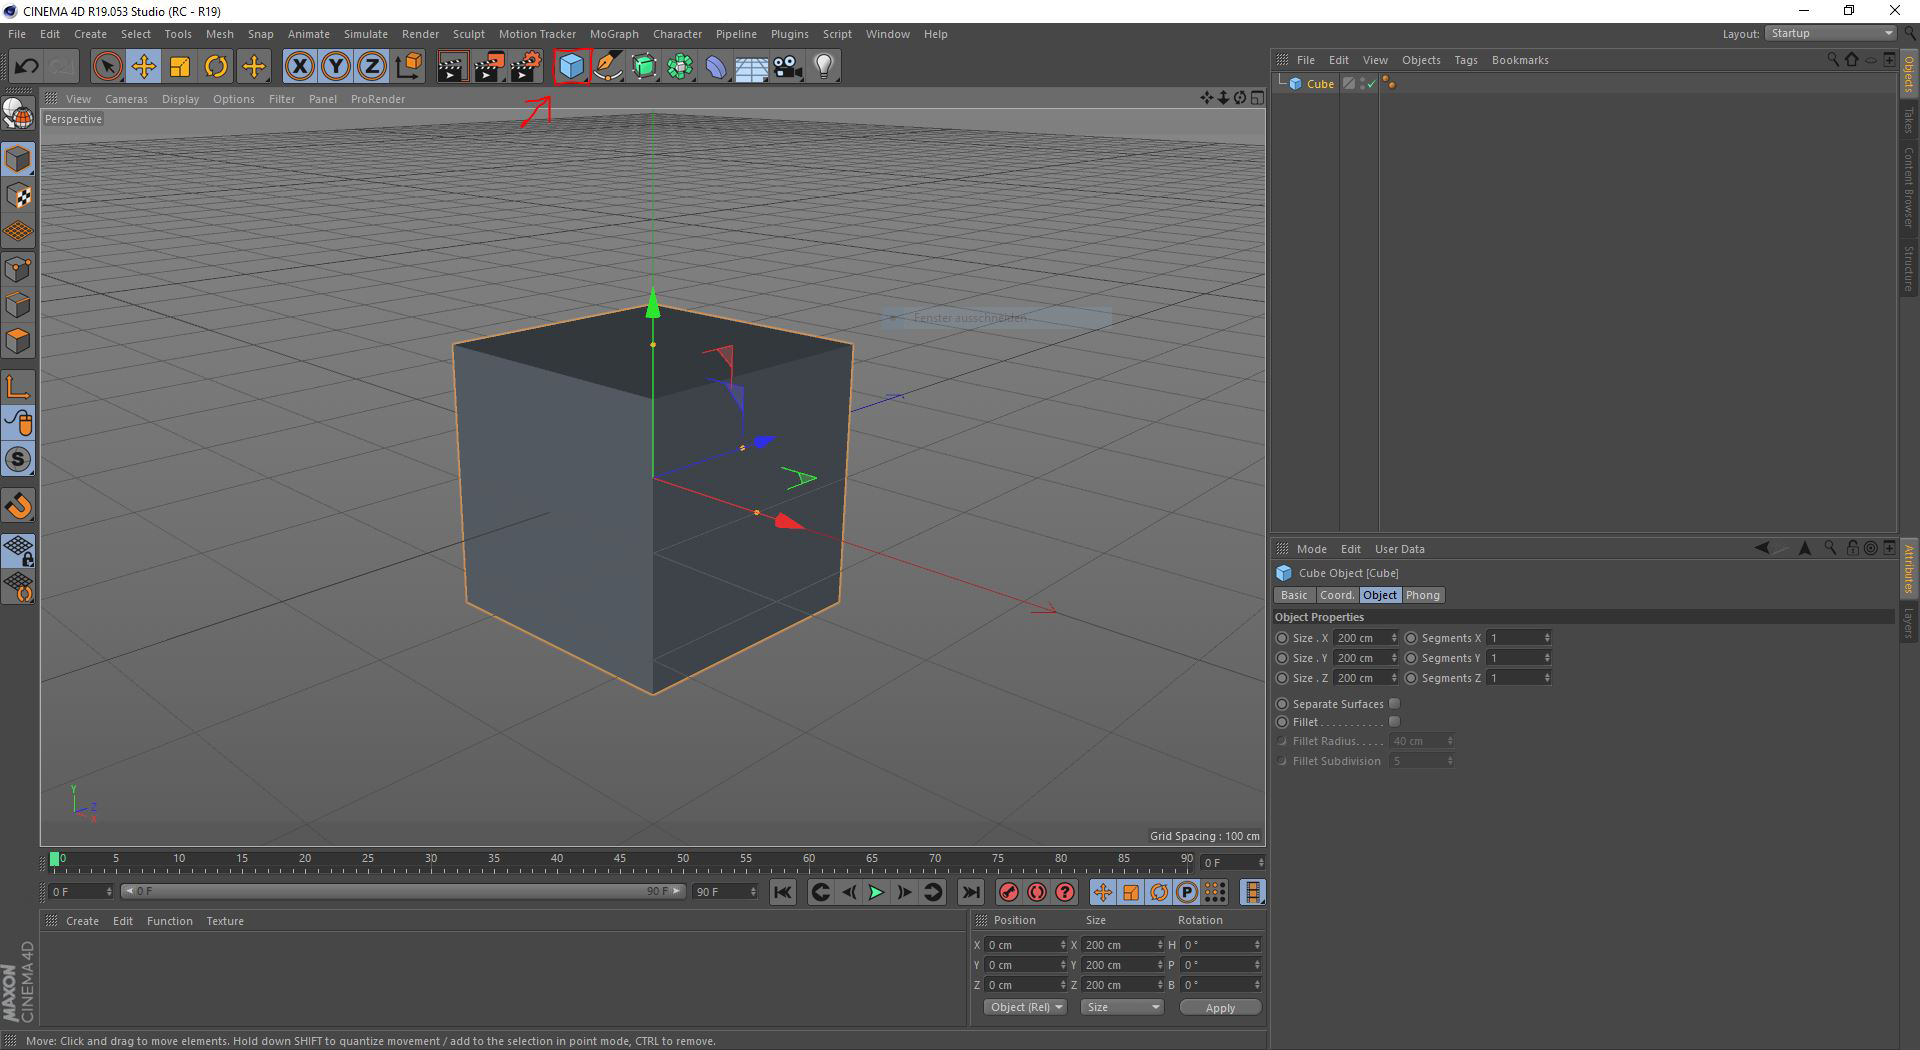
At the moment our scene is empty, as we cannot see any objects in it. We have several ways of creating objects, but the easiest way is to click on the blue cube icon in the top toolbar (see the red frame on the screenshot), which should create a cube in the centre of the scene. We will now learn how to navigate the scene to move our view dynamically. To move, you'll need keys 1, 2 and 3. 1 is for panning, 2 for zooming and 3 for rotating. Simply press and hold one of these keys, click the left mouse button anywhere in the scene and move the mouse. You will immediately see how it works. After a while you will also notice that the tool behaves differently depending on where you place the mouse wheel, but it is very intuitive.
| 1 | 2 | 3 |
|---|---|---|
| Pan/Move | Zoom | Rotate |

If you don't want to move the view, but the object, you'll need other tools. These are basically Move, Rotate and Scale. You can select the tools from the toolbar at the top, or use the corresponding keyboard shortcuts E, R and T. Once you have selected the desired tool, you can move, rotate or scale the object freely by clicking anywhere in the viewport, holding down the mouse button and moving the mouse, or you can be more precise by using the Gizmo or Axis. For example, if you want to move an object along the X axis, simply select the Move tool (E) and click on the red arrow of the Gizmo. Now you are only moving in the X direction. Remember: X is red, Y is green and Z is blue.
| E | R | T |
|---|---|---|
| Move | Rotate | Scale |
Coordinate System
This brings me to the last point of this tutorial. You have already seen that there are three axes: X, Y and Z. Each axis is represented by a corresponding colour: Red, Green and Blue. You have the same colouring when you rotate, but here red means to rotate around the X-axis, green around the Y-axis and blue around the Z-axis. You can use the Gizmo to selectively move, scale or rotate your objects.
Another important point is that there is a world centre with the absolute coordinates 0, 0, 0. This is the centre of your virtual world or scene. When you open a new scene, this absolute zero is at the centre of your screen. When you create new objects, they are placed exactly there. In addition, objects also have an object centre, which means that the centre of an object is not the same as the centre of a scene (absolute origin). Obviously, when you move an object, its origin is no longer at the origin of the scene. This opens up a whole world of absolute and relative coordinates. For now, it is enough to understand that there are different origin points (for the scene/world, for each object, for parent objects) and that they do not necessarily have to be the same.
Primitive Objects

The easiest way to create an object is to use the Primitive Objects button at the top. You have already created a Cube in this chapter, but if you press and hold the Cube button, a whole sub-menu opens up with more objects to choose from. We'll stick with the Cube, though, as it's the simplest object in this list. You already know how to move, rotate and scale it. You can also use the little golden handles to change its dimensions. Just try grabbing them and moving them around. Note that you can't select individual points on this 3D object, such as its corners. As this is still a Primitive Object, there are no real points, edges or polygons. Primitives are calculated shapes. So in this case we have the shape of a cube with certain dimensions and a position. Later we will see how to convert a Primitive Object into a Polygon Object. Go ahead and create a bunch of other objects and see how they work and what you can do with them. In the Attributes Manager on the bottom right you will find a number of options to play with depending on the object you have created.
Splines

Right next to the cube button you can see a Pen Tool which, when selected and pressed, opens up a whole sub-menu of objects we call splines. For example, if you create a Helix Spline, you'll see a spring-like line in your scene. Note that splines are not real 3D objects, as they are simple lines. Also, these splines are primitive objects where we can change certain options and values, but not select individual points. Splines are used to construct 3D objects using the spline modelling method. Splines must always be combined with a generator. In the following exercise we will use this technique. First we will create some splines and then we will connect them with a generator to create a complete 3D object. The advantage of spline modelling over box modelling is the flexibility of modelling in 3D. Once set up, a system of splines and generators can be manipulated very easily without worrying too much about individual points, edges or polygons.
