Exercise 1a: RTIBuilder
The software we will be using in this chapter is called RTIBuilder and is provided by the Cultural Heritage Imaging Cooperation. It is free and (more or less) open access. So go to their site and go to What we offer and Downloads. Direct link!
Installation
On the next page you can click on Process - RTIBuilder free software and choose your version (either PC or Mac) on the next page. Rightly, there is a warning that this is old software, but you can either ignore it or go to the ReLight chapter. Start the download! Install the package on your computer.
Attention for PCs: Make sure you install the RTIBuilder software in the root folder of your computer (C:\). Don't install it in a program folder or anything else. The RTIBuilder does not handle spaces or special characters very well. Make sure it is installed in something like: C:\RTIbuilder_v2_0_2\.
Your system may tell you that this file contains a virus. I've installed this software a hundred times and I'm pretty sure it doesn't. Feel free to download and install it anyway. If you have problems downloading, try another browser.
At least for PC you also need Java 6 or higher, which you can get here. It is free for personal use, so please install it as well. Once you have installed both software, you should be able to start the RTIBuilder, which you should find under RTIBuilder/RTIBuilder in your start menu (Windows). Please try and see if the software starts.
PTM Fitter
The software works like this, but only offers the HSH Fitter, which is the algorithm that calculates the RTI. This is fine, but there is another fitter, the PTM Fitter, which is a bit better and offers more possibilities with filters after creating the RTI. Please download this ZIP file and unzip it into the Fitters folder of your RTIBuilder installation. Normally you should find the folder under C:\RTIbuilderv202\Fitters\. When you unpack the ZIP you should find two subfolders in the Fitters folder: HSHfitter and PTMFitter. In the PTMFitter folder you'll find four files.
Building the RTI

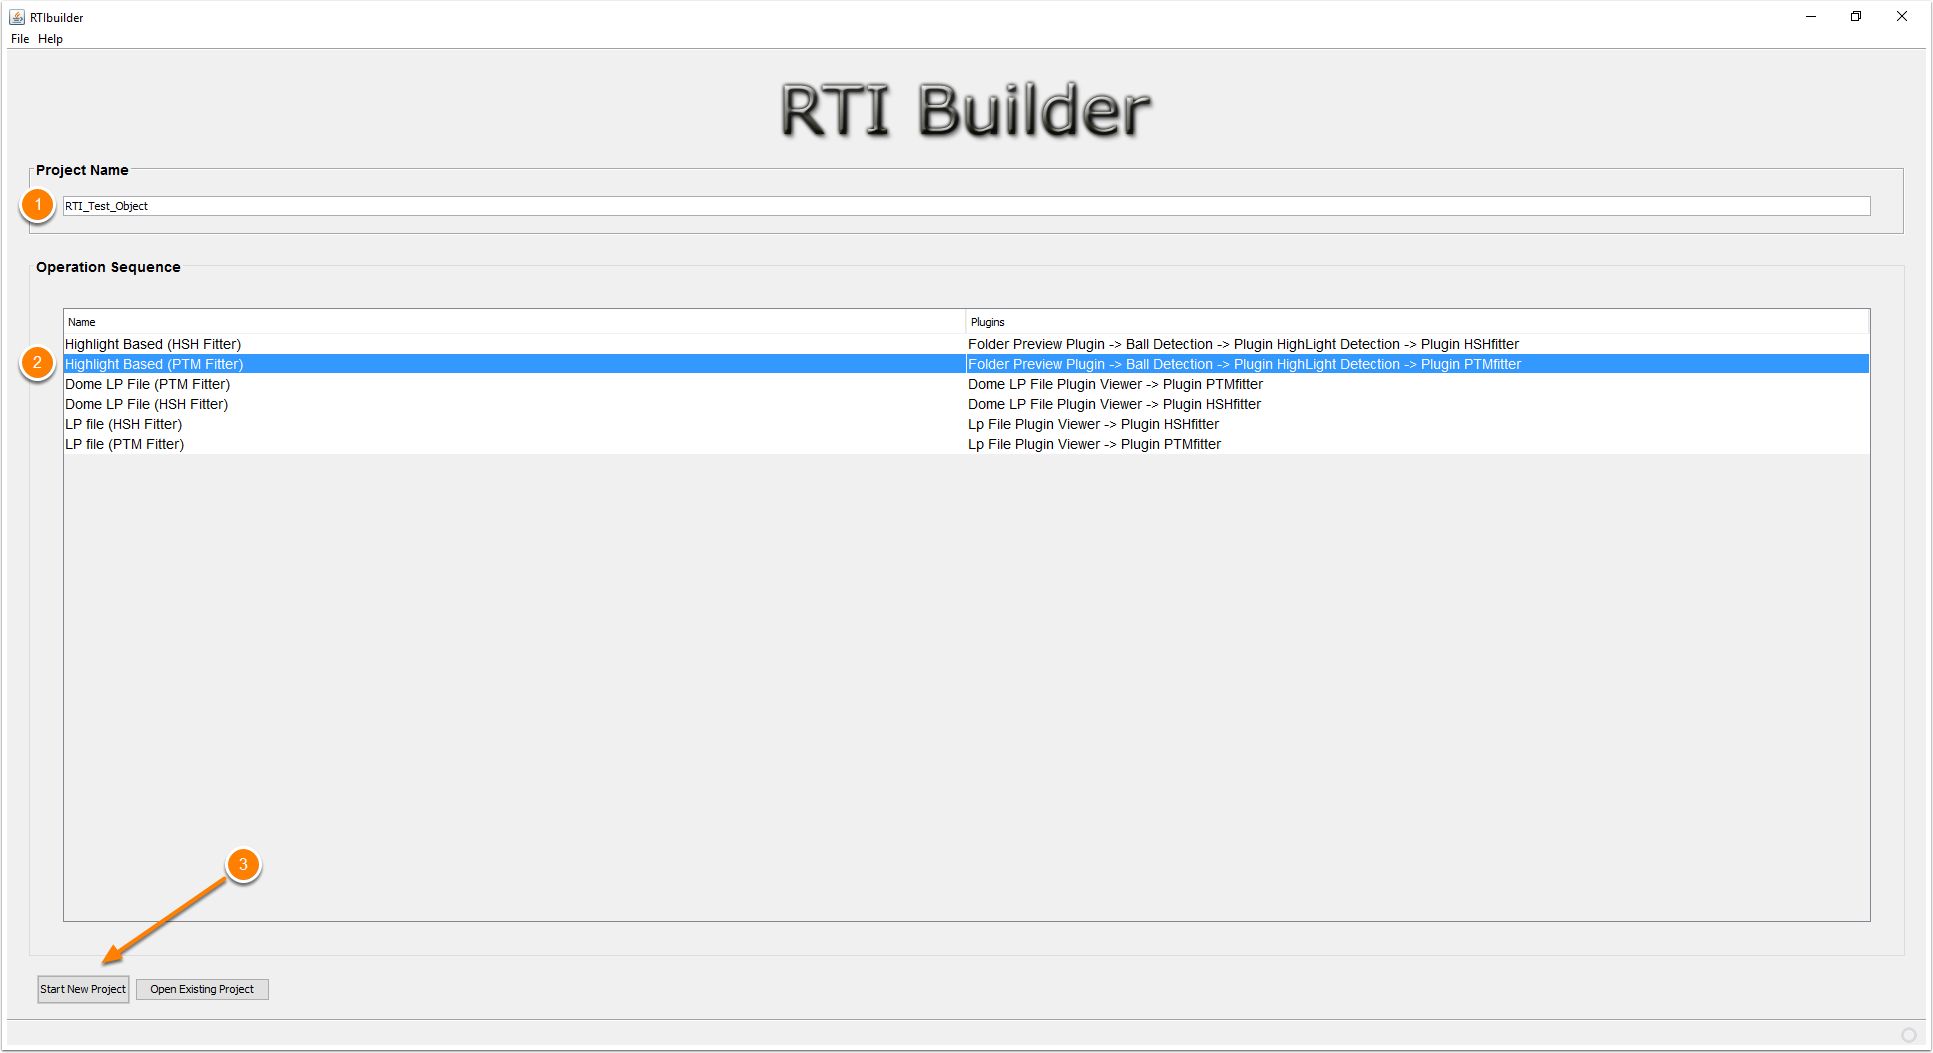
Here we will explore the RTIBuilder software and have a step-by-step guide on how to use it to create an RTI image. When you open the software, you will see the start screen where you can enter a project name (no spaces), select an operation sequence and start the process. Enter a suitable name for your project without spaces (1), select Highlight Based (PTM Fitter) (2) and click on the Start New Project button (3). You must be careful with your typing. Spaces and odd symbols don't work well with this software. If you have any problems, it is most likely due to a crooked path or file name.
In the next screen we have to click on the Open Folder button to open our folder with the images. RTIBuilder needs a certain file structure to work. For this reason the images should be saved in a folder called jpeg-exports, which in turn is located in a project folder. The folders must not have any spaces in the name, so it is a good practice to store the project folder in the root folder of the hard disk (e.g. C:\Project_Name\jpeg-exports).

After RTIBuilder has loaded all the images (which can take a while), you can see them in the programme. On the left (1) you have a preview window of the selected image (default is the first image) and on the right (2) you have the thumbnails of the complete set of images. In the bottom left corner you can enter some metadata (3). Basically, you can enter your name and the name of the project in the appropriate fields. It is possible to add additional metadata to provide more information about the documentation process. You could record the camera and lens you used, or the length of the string you used to create the images, and so on. You can find some more suggestions on what kind of metadata to use on the following page: https://ianus-fdz.de/it-empfehlungen/forschungsmethoden/rti. For now, we will leave it at our name and the name of the project. You can click on the Next button (4).

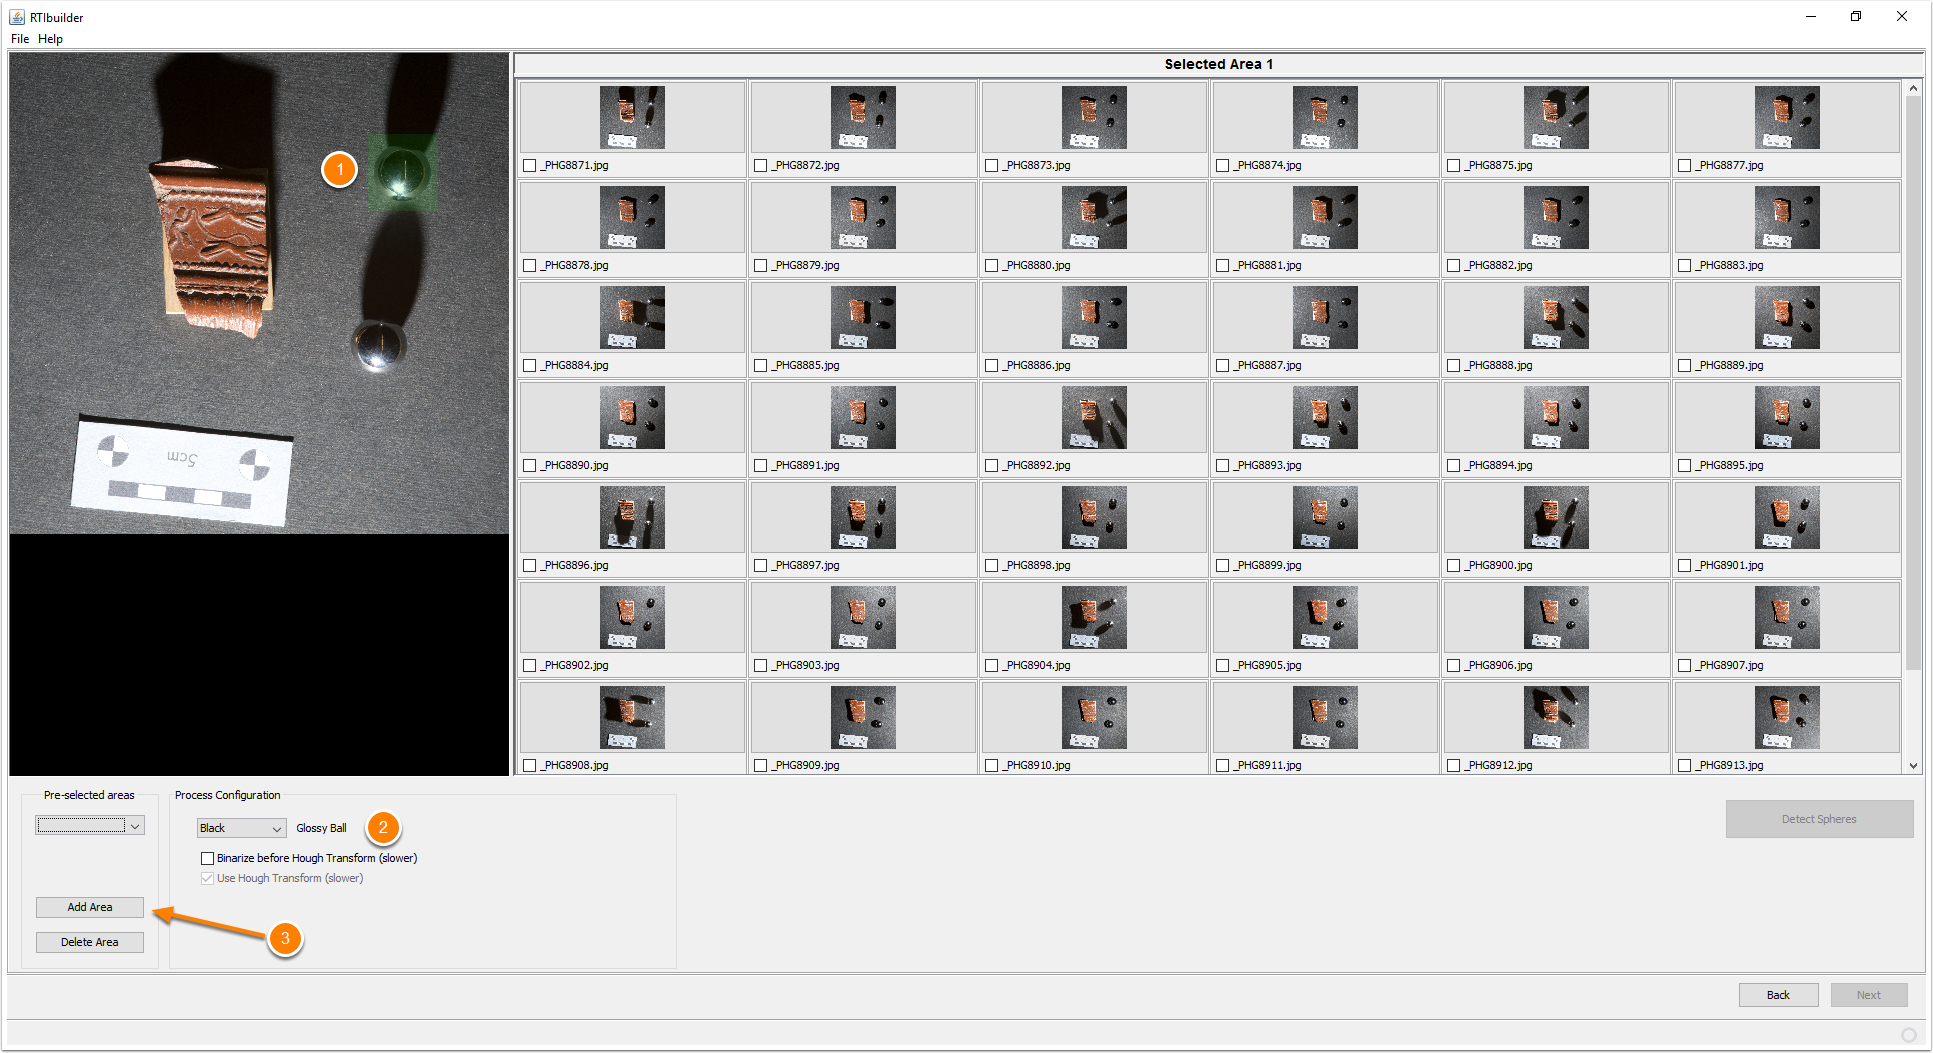
In the next screen we need to tell the software where in these images we have placed our sphere. In this version of RTIBuilder we only need to select one sphere, but in future versions more spheres can be used. You can create a green rectangle like in screenshot (1) by simply clicking and dragging with your mouse. Don't worry, you'll be able to adjust this rectangle in a minute. Leave the process configuration at Black shiny balls (2). We have used silver ones, but as there is only one option for black and red, we will leave it at black. Press Add Area (3) to define the area. The green rectangle turns red. You can now adjust the rectangle by dragging it with the little handles at the corners (1). Try to enclose the whole sphere and leave a little space around it. Don't make the rectangle too small. When you are happy, press the Detect Spheres button.

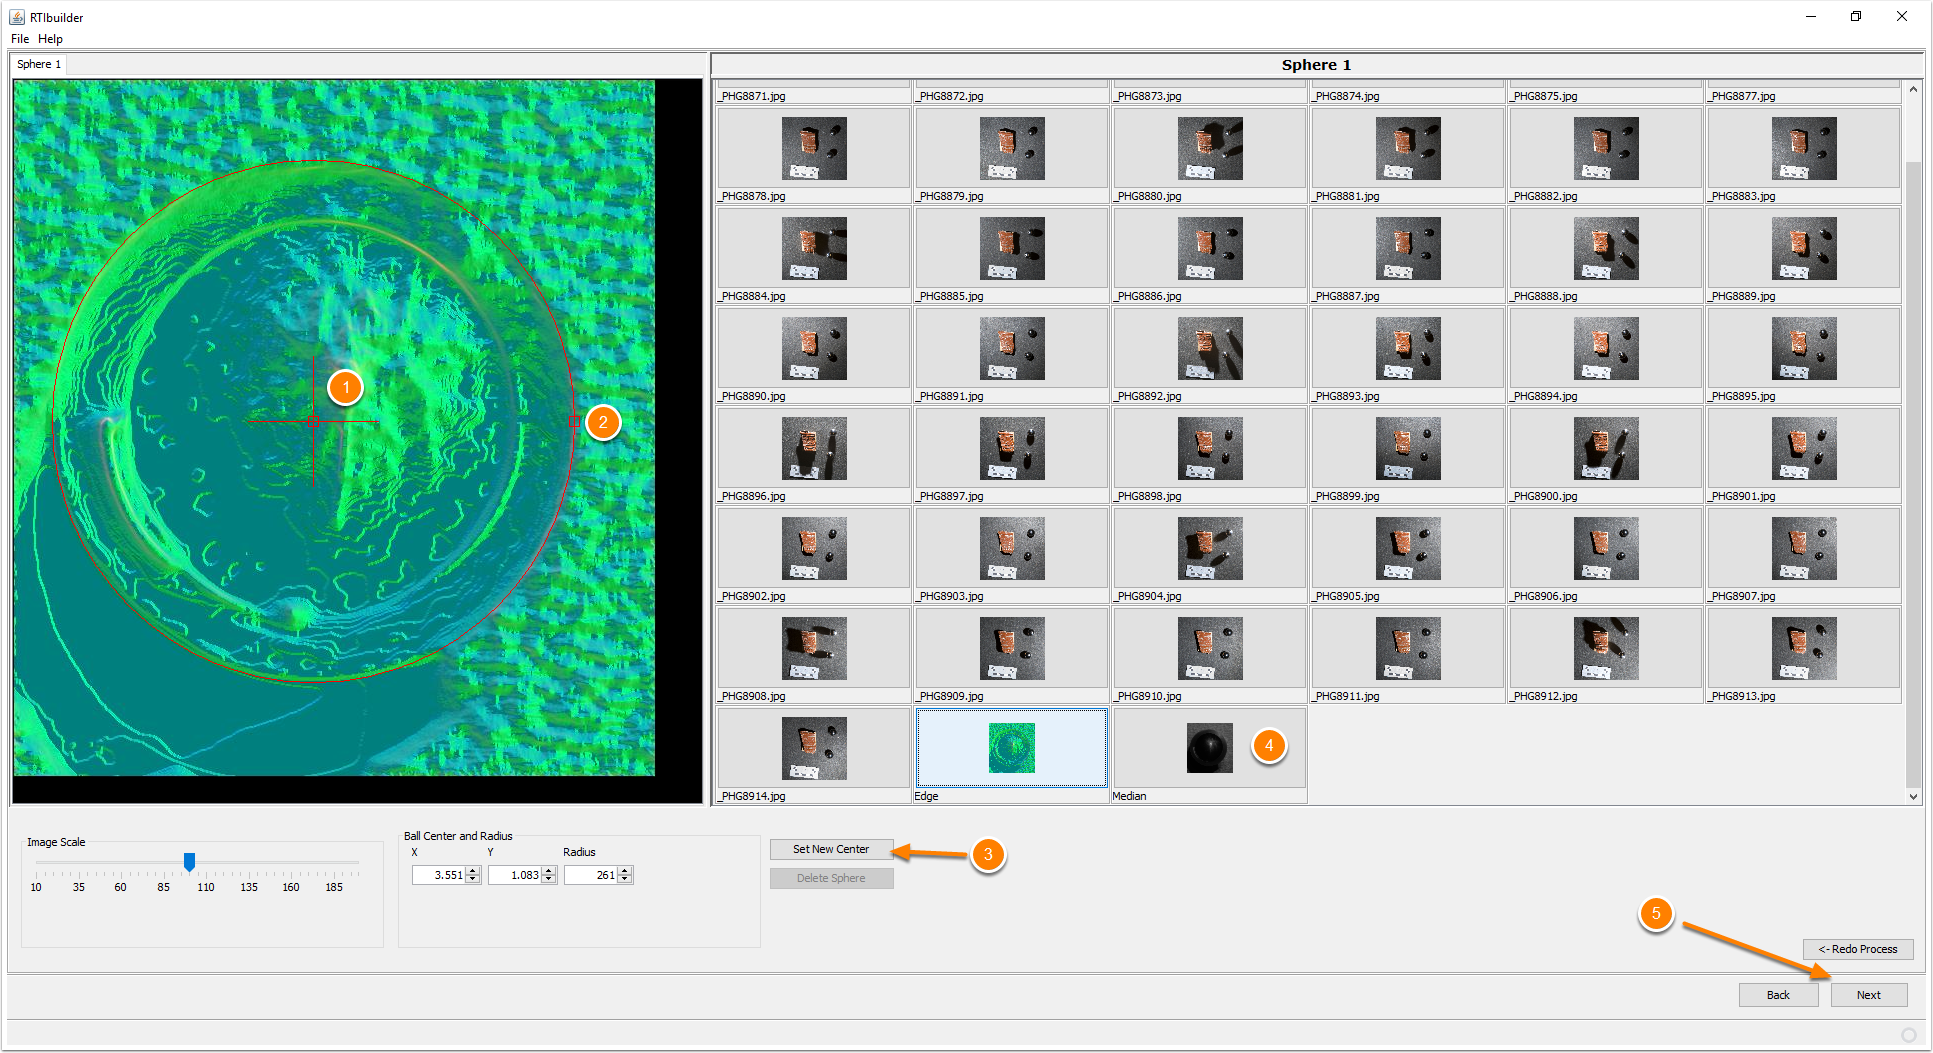
In the next screen you will see a green representation of your sphere with a red circle around it. The software does its best to recognise the sphere automatically, but most of the time we have to help a little. Using the small handle in the middle of the sphere (1), we can move the red circle around. The small handle on the right (2) allows us to adjust the diameter. Try to be as precise as possible. Once you have moved the red circle, save the new position and diameter with the Set New Centre button (3). If the green representation doesn't work for you, you can switch to a normal representation by selecting the last thumbnail in the list of images on the right (4). Again, after moving and scaling the red circle, save the new position and diameter with the Set New Centre button (3). When you are satisfied, click on the Next button (5).

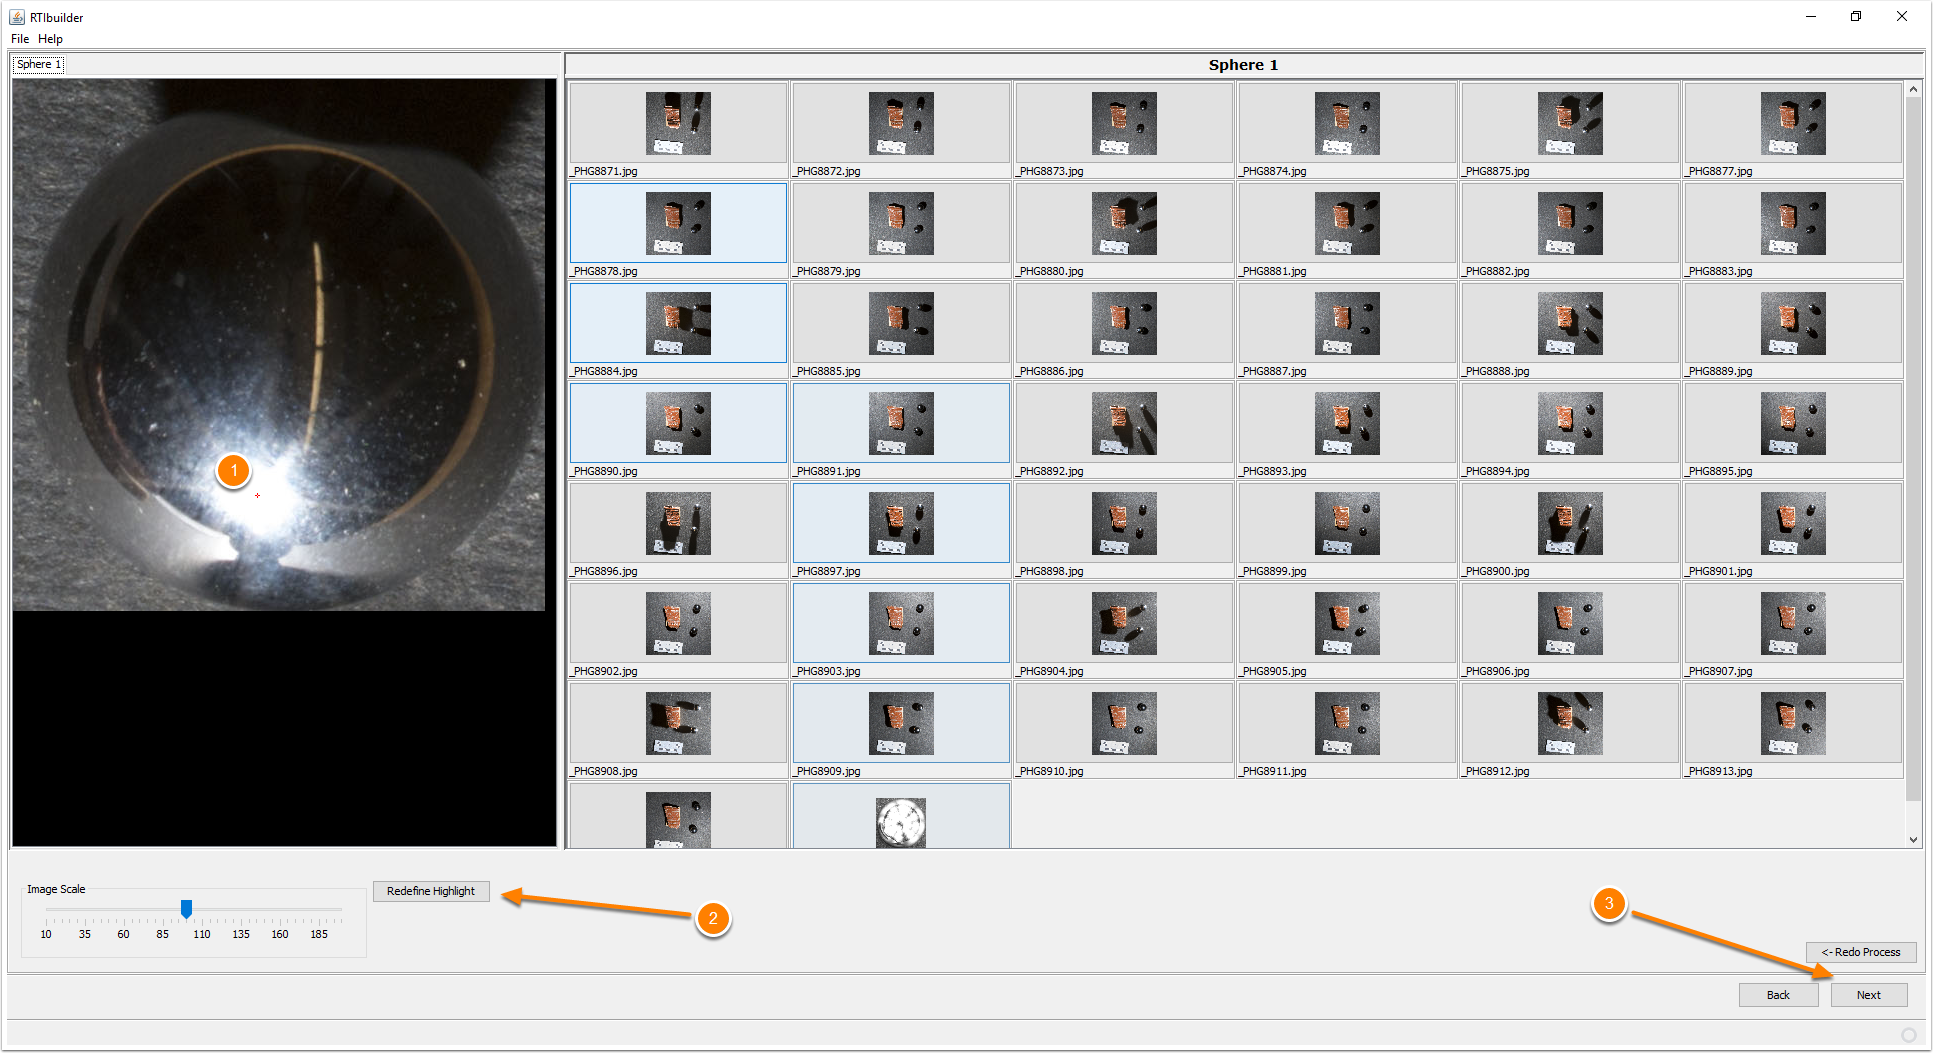
On the next screen, you will see your sphere with the customised red circle around it. You can now simply press the Highlight Detection button. After a while the software will show you the detected highlights by placing a very small red cross in the middle of them (1). For the most part, RTIBuilder detects highlights quite well. However, it struggles with low light angles. We therefore have to check each image and the detected highlight represented by the red cross. This is more of a problem with 'handmade' RTIs and less so with RTIs that have been made with a closed dome. Open RTIs tend to reflect more than one highlight, whereas a closed dome prevents this. If you are using a dataset from a handmade RTI, go through each image in the thumbnail list and check that the little red cross is exactly in the centre of the reflected flash on the sphere. If it is not, you can move the red cross with the mouse and save the new position with the Redefine Highlight button (2). When you have checked all the images, click on the Next button (3).

RTIBuilder is now almost ready to start the fitting process. The only thing we need to do is to define a cropping frame. Just click on the checkbox next to Use crop. You can now define a frame around the object. Try to leave some space around it (1). We do not need the spheres anymore, we just want to see the object itself. Depending on your version, you may need to find the PTMFitter file first. Click on the Find button (2) and navigate to the folder C:\RTIbuilderv202\Fitters\PTMFitter and select the PTMFitter.exe file. You can now simply press the Execute button (3).
After the fitting is finished you can navigate to your project folder into the subfolder finished-files and double click on the PTM file you just created. The RTIViewer application should open and you can now see the result of your fitting process. Have fun with it!
