Chapter 1: Taking the photos
So taking the photos is a very important task in Structure from Motion. It basically creates the data that the algorithms need to build the point cloud. Of course, we need to make sure that the photos we take are of the best quality. Before we take the photos, we need to make sure that our object is correctly positioned and well lit.
Setup the object

Setting up the object is half the job. You need to consider location, lighting and accessories. For the location, you need to find a place that is well lit. The best situation would be outside on a sunny day, but in the shade. Of course, sometimes this is not possible and we have to work with artificial lighting. The same principles apply, but the object needs to be lit very well and evenly from all sides. This also means from below. In rooms where the light comes from above, the lower parts of the object aren't usually lit very well. Finally, you need a colour checker and a measurement. A colour checker is important to colour correct the images you have taken. This will give you a more realistic texture. The measurement is important to scale the final model to the correct dimensions. As you will remember, the models created by the SfM algorithms are usually not scaled. We need to correct this.
Setup the camera
Setting up your camera is a tricky business. If you have a good DSLR that gives you the best results, it takes time to find the best options. If you are a pro, you probably know what you are doing, but if not, you will need to experiment. The settings you can play around with are basically three: 1. the aperture, 2. the ISO and 3. The shutter speed. Setting your camera to A or Av will (usually) allow you to play around with the aperture (F-numbers) and ISO values. To understand what these mean, we need to do some explaining.
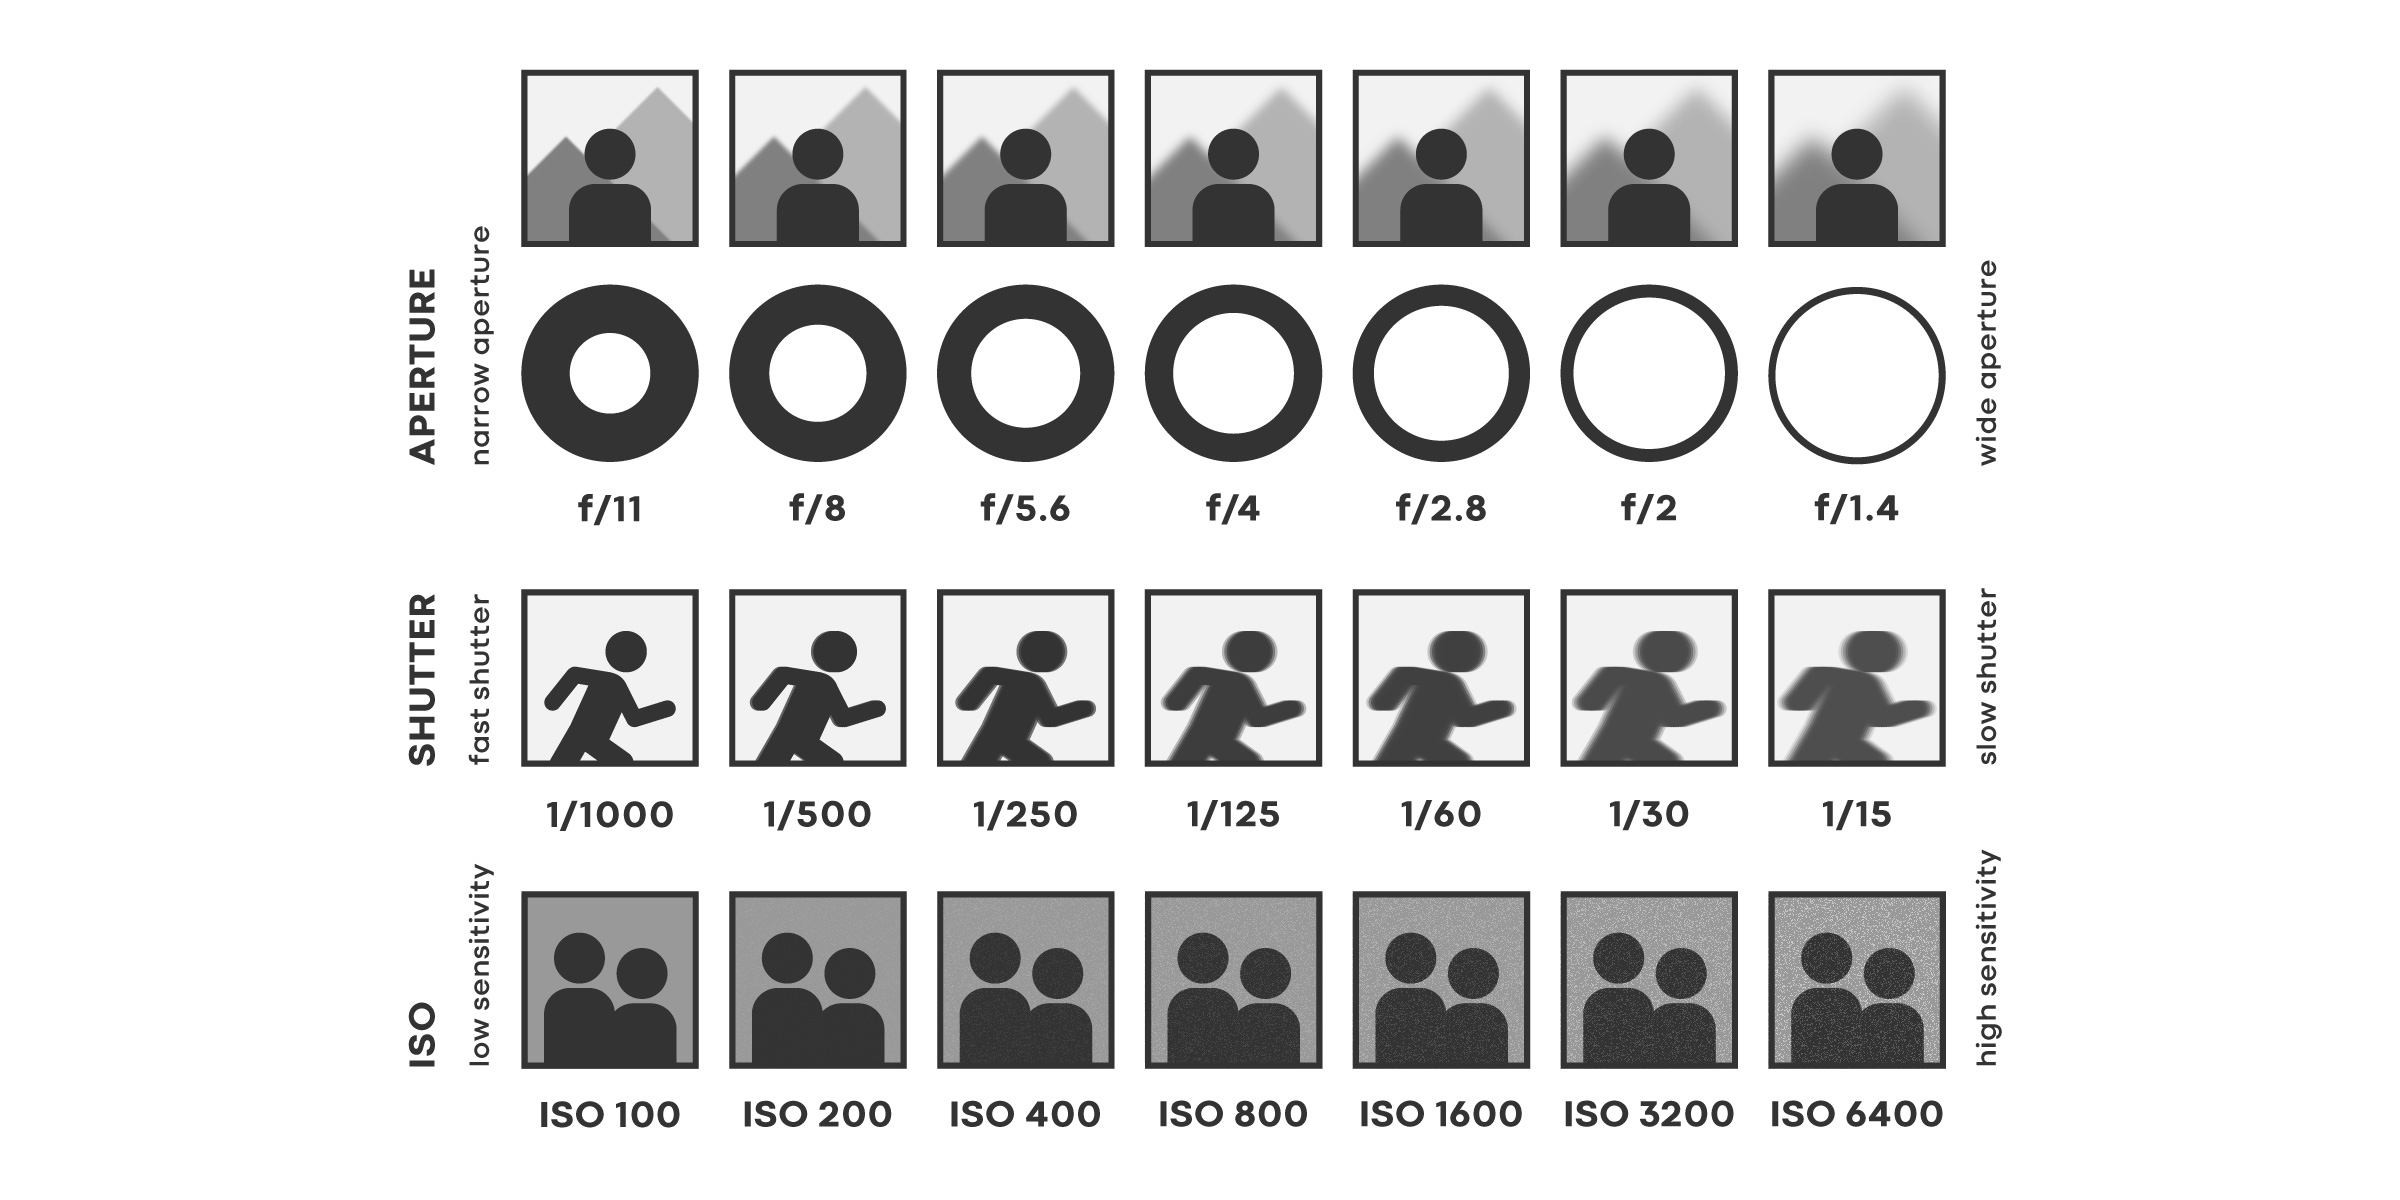
The Aperture
This is basically how much your lens will open up to let light in when you take a photo. Typical values are between F2 - F16, where the higher the number, the smaller the aperture, which means the less light gets into your camera. The effect is a mixture of depth of field (background blur) and diffraction (overall sharpness). If you shoot at low f-stops, the background will be blurred, but the foreground will be sharper. If you shoot at higher f-stops, the background will be less blurred, but the overall sharpness will not focus on your subject. You want to find a value that makes your subject completely sharp (right up to the edges).
The ISO
This value basically determines the quality of your photos. The lower the value (such as ISO 100), the better the quality. But for this to work, you need good lighting. If the lighting is poor, a higher ISO may help, but at the expense of image quality. The higher the ISO value, the more "grainy" your images will be.
The Shutter Speed
In Aperture Mode (Av or A on your camera), you cannot control this value, as it is determined by the other values. Basically, you want to keep this value as low as possible. It tells you how long the lens will be open to take the picture. A very small value (such as 1/200) is good because the camera will take the picture very quickly and it will be sharper. If the value is high (such as 1/2 or more), the lens takes a long time to take the picture. During this time, you will make some micro movements while holding the camera. These movements result in blurred images.
Examples
To better understand what I mean, take a look at the list below. I did a bit of experimenting with the values. You can see that the lower the f-number, the slower the shutter speed. But you can also see that the lower the f-number, the more blurry the image becomes. Even to the point where part of the subject is out of focus (around the edges).
| Image | F-number | ISO value | Shutter Speed |
|---|---|---|---|
 |
F8 | ISO 800 | 1/8 |
 |
F5 | ISO 800 | 1/20 |
 |
F2,5 | ISO 800 | 1/80 |
 |
F8 | ISO 200 | 1/2 |
 |
F5 | ISO 200 | 1/5 |
 |
F2,5 | ISO 200 | 1/25 |
Take a closer look at the photos and note the outer edge of the subject. The best setting here is the first one, as the object is sharp enough, even around the edges, and the 1/8th shutter speed is doable, if not perfect. The lighting here is not very good, but we have to work with it.
Take the photos

Once everything is set up, just start taking pictures. A good way to do this is to start at one point and move around the object in a circle. First try to find a very comfortable circle where you just stand in front of the object and walk around it in 20° steps. Each circle should be about 18 photos, so take small steps. The second circle can be a little closer and from above, so you have a steeper angle. Again, try to get at least 18 photos for this circle. The last circle should be from below, so you may have to get down on your knees or even crawl (see photo above!). It doesn't matter, a good archaeologist has to take good photos!
Make sure you do not play around with the settings once you have started taking photos. All pictures in a set should be taken with the same settings. Also remember not to move the subject or the table on which the subject is standing. Also, don't move anything in the background, such as a chair or a water bottle. The only thing that should move is you with the camera. Everything else must be very still.